Azure Image Builder lets you work with Windows or Linux images, from the Azure Marketplace or existing custom images, and add your own customizations. It’s a solution that helps you to automate the process of managing images over the Azure platform.
For a better understanding of this solution, let’s suppose that you’re responsible to maintain several images (OS Patching, Software installation and so on) and these images are distributed on Azure Compute Gallery.
On your daily bases tasks, you’ll need to create VMs, apply operating system patches, install/uninstall software, etc. Trust me, it’s really hard to maintain a pattern if it’s a manual job. It helps you to create a standard process to build these images version.
Why should you use Azure Image Builder?
- Image builder allows you to distribute, replicate, version, and scale images globally. Additionally, you can distribute the same resulting image as a VHD, or as one or more managed images without rebuilding from scratch.
- Image Builder can fetch customization data from various sources removing the need to collect them all together in one place to build a VM image.
- Image Builder can be integrated with Azure DevOps.
- Remove the need for manual tasks.
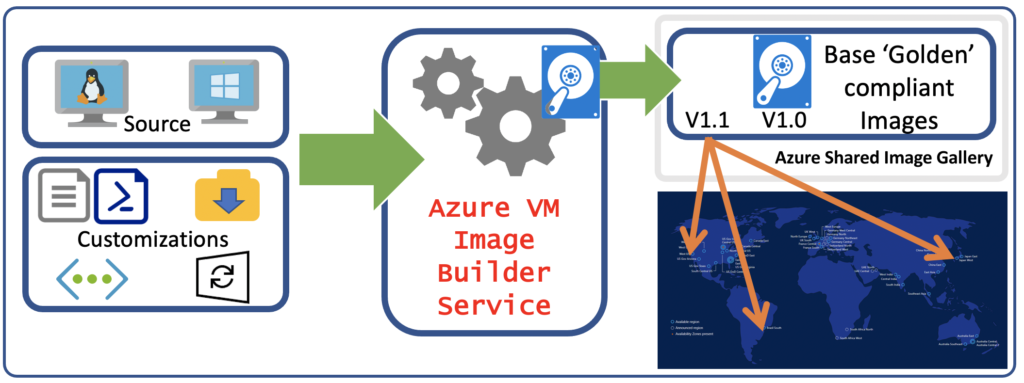
The Azure VM Image Builder is a fully managed Azure service that is accessible by an Azure resource provider. Provide a configuration to the service that specifies the source image, customization to perform and where the new image is to be distributed, the diagram below shows a high-level workflow:
Your configurations can be set by using PowerShell, Azure CLI, ARM templates and using the Azure VM Image Builder DevOps task, once you trigger the deployment of your customization, it will create an Image Template Resource.
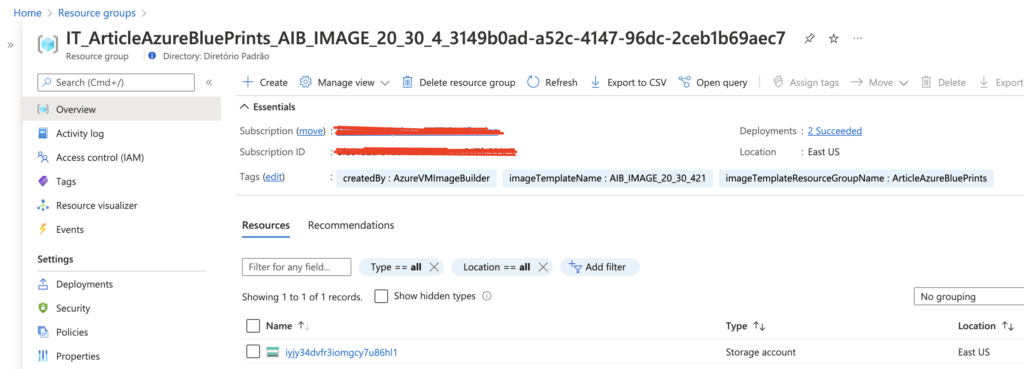
Once your Image Template is created, you’ll see a new resource group created in your subscription, with the following format: (IT_\\(GUID)), this resource group contains files and scripts referenced in the Image Template.
When you execute the Image Template resource, the service will deploy additional resources for the build, like the VM, Network Interface, Disk, etc. If you didn’t specified and existing V-Net in your template, AiB will create a temporary one for this deployment.
Once the build is finished all resources will be deleted, except for the staging resource group and the storage account, to remove them, delete the Image Template resource.
Creating our first Image Template
To create our template, we’ll use this documentation as a reference.
Note: To have a better control of our lab, lets create a dedicated Resource Group for our Image Template.
First of all, we need to make sure that our subscription has the following service providers registered.
#Azure Image Builder Service Provider

#Check if the service Provider is enabled

az feature show --namespace Microsoft.VirtualMachineImages --name VirtualMachineTemplatePreview | grep state

#Register the Service Provider

az feature register --namespace Microsoft.VirtualMachineImages --name VirtualMachineTemplatePreview

#Check the AiB dependencies

az provider show -n Microsoft.VirtualMachineImages | grep registrationState
az provider show -n Microsoft.KeyVault | grep registrationState
az provider show -n Microsoft.Compute | grep registrationState
az provider show -n Microsoft.Storage | grep registrationState
az provider show -n Microsoft.Network | grep registrationState

#Register if they're not enabled

az provider register -n Microsoft.VirtualMachineImages
az provider register -n Microsoft.Compute
az provider register -n Microsoft.KeyVault
az provider register -n Microsoft.Storage
az provider register -n Microsoft.Network
Create the User Assign Identity
# create user assigned identity for image builder to access the storage account where the script is located
identityName=aibBuiUserId$(date +'%s')
az identity create -g <ResourceGroupName> -n $identityName

# get identity id
imgBuilderCliId=$(az identity show -g <ResourceGroupName> -n $identityName --query clientId -o tsv)

# get the user identity URI, needed for the template
imgBuilderId=/subscriptions/$subscriptionID/resourcegroups/$imageResourceGroup/providers/Microsoft.ManagedIdentity/userAssignedIdentities/$identityName

# download preconfigured role definition example
curl https://raw.githubusercontent.com/azure/azvmimagebuilder/master/solutions/12_Creating_AIB_Security_Roles/aibRoleImageCreation.json -o aibRoleImageCreation.json

# update the definition
sed -i -e "s/<subscriptionID>/$subscriptionID/g" aibRoleImageCreation.json
sed -i -e "s/<rgName>/$imageResourceGroup/g" aibRoleImageCreation.json

# create role definitions
az role definition create --role-definition ./aibRoleImageCreation.json

# grant role definition to the user assigned identity
az role assignment create \
    --assignee $imgBuilderCliId \
    --role "Azure Image Builder Service Image Creation Role" \
    --scope /subscriptions/$subscriptionID/resourceGroups/$imageResourceGroup
Well, as we already created our Resource Group and User Assigned Identity. Lets focus on our template!
For those that are not familiar with ARM templates, please take a look on this article.
This is the basic template format:
{
    "type": "Microsoft.VirtualMachineImages/imageTemplates",
    "apiVersion": "2021-10-01",
    "location": "<region>",
    "tags": {
      "<name>": "<value>",
      "<name>": "<value>"
    },
    "identity": {},
    "properties": {
      "buildTimeoutInMinutes": <minutes>,
      "stagingResourceGroup": "/subscriptions/<subscriptionID>/resourceGroups/<stagingResourceGroupName>",
      "vmProfile": {
        "vmSize": "<vmSize>",
        "proxyVmSize": "<vmSize>",
        "osDiskSizeGB": <sizeInGB>,
        "vnetConfig": {
          "subnetId": "/subscriptions/<subscriptionID>/resourceGroups/<vnetRgName>/providers/Microsoft.Network/virtualNetworks/<vnetName>/subnets/<subnetName>"
        },
	"userAssignedIdentities": [
          "/subscriptions/<subscriptionID>/resourceGroups/<identityRgName>/providers/Microsoft.ManagedIdentity/userAssignedIdentities/<identityName1>",
	  "/subscriptions/<subscriptionID>/resourceGroups/<identityRgName>/providers/Microsoft.ManagedIdentity/userAssignedIdentities/<identityName2>",
	  "/subscriptions/<subscriptionID>/resourceGroups/<identityRgName>/providers/Microsoft.ManagedIdentity/userAssignedIdentities/<identityName3>",
	  ...
      ]
      },
      "source": {},
      "customize": [],
      "validate": {},
      "distribute": []
    }
  }
Microsoft does have a gallery with some Image Templates, you can check them on their official repository on GitHub.
The section that we use to execute our customizations is called “customize”, below you’ll see the structure format and some recommendations:
- You can use multiple customizers
- Customizers execute in the order specified in the template.
- If one customizer fails, then the whole customization component will fail and report back an error.
- It is advised you test the script thoroughly before using it in a template. Debugging the script on your own VM will be easier.
- don’t put sensitive data in the scripts.
- The script locations need to be publicly accessible unless you’re using MSI.
"customize": [
            {
                "type": "Shell",
                "name": "<name>",
                "scriptUri": "<path to script>",
                "sha256Checksum": "<sha256 checksum>"
            },
            {
                "type": "Shell",
                "name": "<name>",
                "inline": [
                    "<command to run inline>",
                ]
            }

        ]
For Windows machines, is also possible to apply pending patches.
For more details, please check this document.
{
            "type": "WindowsUpdate",
            "searchCriteria": "IsInstalled=0",
              "filters": [
                "exclude:$_.Title -like '*Preview*'",
                "include:$true"
            ],
              "updateLimit": 20
          }
For this article, I added a new folder to our Repository. Where you can check a pipeline example and an ARM Template.
Hello very nice site!! Guy .. Beautiful .. Amazing .. I will bookmark your site and take the feeds also?KI am glad to seek out numerous useful information here within the publish, we’d like work out extra strategies in this regard, thanks for sharing. . . . . .
Spot on with this write-up, I actually assume this web site needs far more consideration. I’ll probably be once more to learn far more, thanks for that info.