A couple of weeks ago, a teammate asked me if is possible to enable Accelerated Networking in several VM’s at the same time.
Enabling it in a network interface is a simple process and, it does not require much technical knowledge. Over the Azure Portal, it takes only a few clicks and is easy to enable via CLI or PWSH as well.
But imagine if you need to enable it on hundreds or thousand VM’s at the same time. Well, it would be boring! Thinking on this scenario, I decided to create automation using Azure CLI and PWSH that allows you enable this feature over a batch.
Before running the script on your environment, let’s understand how it works.
Accelerated networking enables single root I/O virtualization (SR-IOV) to a VM, greatly improving its networking performance. This high-performance path bypasses the host from the data path, which reduces latency, jitter, and CPU utilization for the most demanding network workloads on supported VM types. The following diagram illustrates how two VMs communicate with and without accelerated networking:

Benefits
Lower Latency / Higher packets per second (pps): Eliminating the virtual switch from the data path removes the time packets spend in the host for policy processing. It also increases the number of packets that can be processed inside the VM.
Reduced jitter: Virtual switch processing depends on the amount of policy that needs to be applied. It also depends on the workload of the CPU that’s doing the processing. Offloading the policy enforcement to the hardware removes that variability by delivering packets directly to the VM. Offloading also removes the host-to-VM communication, all software interrupts, and all context switches.
Decreased CPU utilization: Bypassing the virtual switch in the host leads to less CPU utilization for processing network traffic.
Supported operating systems
The following versions of Windows are supported:
- Windows Server 2019 Standard/Datacenter
- Windows Server 2016 Standard/Datacenter
- Windows Server 2012 R2 Standard/Datacenter
The following distributions are supported out of the box from the Azure Gallery:
- Ubuntu 14.04 with the linux-azure kernel
- Ubuntu 16.04 or later
- SLES12 SP3 or later
- RHEL 7.4 or later
- CentOS 7.4 or later
- CoreOS Linux
- Debian “Stretch” with backports kernel, Debian “Buster” or later
- Oracle Linux 7.4 and later with Red Hat Compatible Kernel (RHCK)
- Oracle Linux 7.5 and later with UEK version 5
- FreeBSD 10.4, 11.1 & 12.0 or later
Supported VM instances
Accelerated Networking is supported on most general purpose and compute-optimized instance sizes with 2 or more vCPUs. On instances that support hyperthreading, Accelerated Networking is supported on VM instances with 4 or more vCPUs.
Support for Accelerated Networking can be found in the individual virtual machine sizes documentation.
Note: If you’re using Availability Sets/Proximity Placement Groups, you may need to deallocate all VM to enable it.
For further details, please check the official documentation.
Accelerated Networking | Microsoft Docs
Below, you see an explanation of the script.
Getting the VM’s name and properties
The easiest way to enable the accelerated networking in several VM’s at same time is getting a list with the VM names or the VM’s inside a specific Resource Group.
I used the command “az vm list” as this command allows me to get a list of VM’s from a specific Resource Group. And after this, the good old friend “foreach” to grab the details of each VM with the “az vm show”.
$azureVM = az vm list -g $resourceGroupName | ConvertFrom-Json

foreach ($vm in $azureVM){

$vmSetting = az vm show -n $vm.name -g $resourceGroupName | ConvertFrom-Json

}
Once I got the VM details, I need to make sure 2 things:
- VM does not have the Accelerated Networking enabled.
As the variable $vmSettings, contains all the VM properties (VM Name, ResourceGroup, Location, Extensions, etc) in this step, we’ll get Network Adapter Name and, after this get the properties of it.
To get the nic properties, I used the command below:
$nicState = az network nic show --name $vmSetting.networkProfile.networkInterfaces.Id.Split('/')[8] --resource-group $resourceGroupName | ConvertFrom-Jso
n
And to check the Accelerated Networking state, I used the property “enableAcceleratedNetworking”. The value of this is True or False.
2. VM should have at least 4 vCPU’s
The command az vm show, does not display the number of vCPUs or Memory, it only displays the VM family, to get these VM details, I had to use the command “az vm list-sizes”.
Honestly this one was a bit tricky (I lost almost 1 hour) because I’m not very familiar with the –query parameter and as it uses JMSPATH to query inside the JSON output …. Well … you can imagine it, right? But hopefully, one of my teammates helped with this.
First, I created a new variable called $vmSize and the value of this is the hardwareProfile.vmsize + ‘ ’.
[string]$vmSize = "'" + $vmSetting.hardwareProfile.vmSize + "'"
Once I got the VM size, I used the query below to get the numberOfCores.
$vmNumberOfCores = az vm list-sizes -l $vmSetting.location --query "[?contains(name, $vmSize)]" | ConvertFrom-Json
After that, I created the condition below:
if($nicState.enableAcceleratedNetworking -eq $false -and $vmNumberOfCores.NumberOfCores -ge 4)
If the condition matches … The magic starts!
Basically, what happens next is:
3. VM will be deallocated
For this happen, I got the current state with the command:
$status = az vm get-instance-view --name $vm.name --resource-group $resourceGroupName --query instanceView.statuses[1] -o json | ConvertFrom-Json
And if the VM is up and running, it will trigger a shutdown as the VM should be deallocated to enable the accelerated networking.
if($status.displayStatus -eq "VM deallocated"){
    Write-Host "VM already deallocated" -ForegroundColor Green

}else{

Write-Host "The VM" $vm.name "is running and will be deallocated" -ForegroundColor Red
              az vm deallocate --name $vm.name --resource-group $resourceGroupName

 }
4. Enable the accelerated networking
To enable it, I used the command:
$enableAccelerated = az network nic update --name $vmSetting.networkProfile.networkInterfaces.Id.Split('/')[8] --resource-group $resourceGroupName --accelerated-networking $enableAcceleratedNic
You can download the script on the link below:
https://github.com/frestevao/AzureAutomations/blob/main/Enable-AzAcceleratedNicMultipleVMs/Enable-AzAcceleratedNicMultipleVMs.ps1
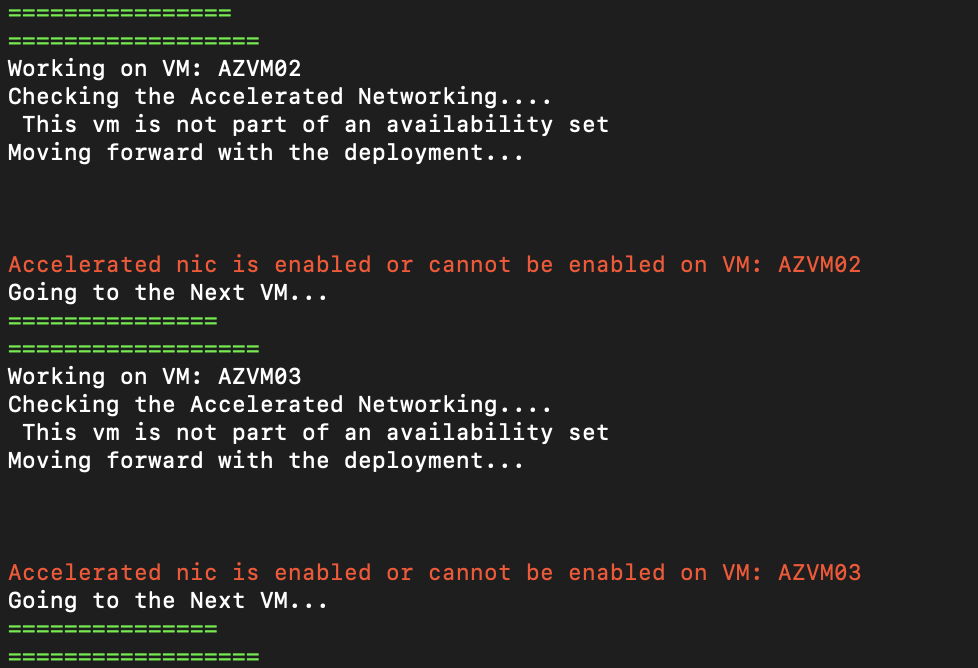
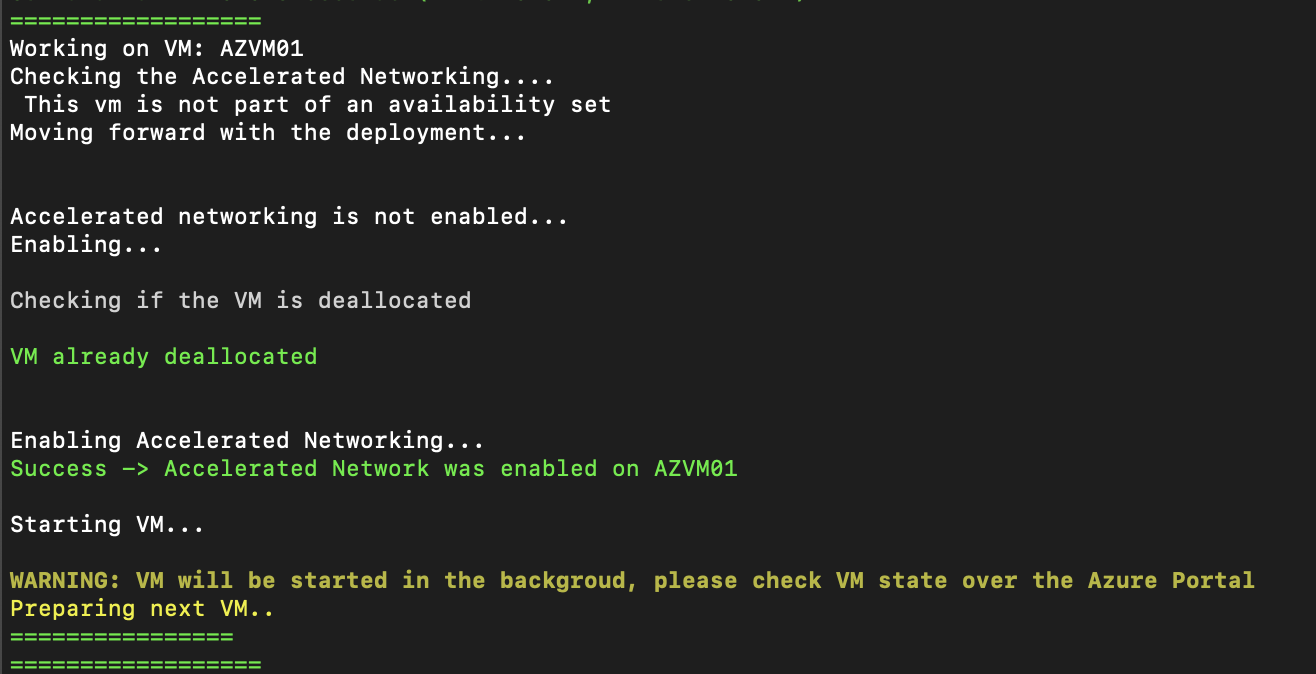
Well, let’s see the script working =D
To execute the script, you’ll need to provide SubscriptionId, TenantId and Resource Group Name.
Execution Example:
.\Enable-AzAcceleratedNicMultipleVMs.ps1 -subscriptionId <SubscriptionId> -tenantId <TenantId> -resourceGroupName <ResourceGroupName>
Accelerated Networking successfully enabled
Accelerated Networking cannot be enabled